Spring Boot + Vue 前后端分离项目
前端
-
安装 node.js , Vue CLI
-
通过 vue ui 命令启动 Vue CLI , 在可视化界面创建前台项目
-
然后用 IntelliJ IDEA 或 VS Code 等工具进行开发
(使用 IDEA 开发需要安装Vue.js 插件,并将javaScript版本改为ECMA Script 6+)
使用 IDEA 导入创建好的前端项目,项目是单一页面和路由跳转实现的
localhost:8080 对应的就是 App.vue 主页面,主页面不变,每次更新页
面其实是通过路由功能 替换主页面当中的 小页面
项目中将 vue2 升级为 vue3
创建Vue项目时可以选择vue的版本,即 vue2或者 vue3
如果忘记选择,项目默认会是vue2
此时只需要在项目目录下,输入:vue add vue-next
将vue2升级为vue3
使用命令行创建 vue3 项目
vue create 项目名
选择手动配置
选择 vuex 和 Router,去掉Linter (按空格键选择或去除)
第一行选择vue的版本 (2.x 或 3.x):vue2使用Element UI,vue3使用Element Plus
解决安装element-plus报错
vue3 项目使用官网的 npm install element-plus –save 命令
安装element-plus插件,结果会报错,导致项目无法启动
解决方案:
项目根目录下:
npm uninstall element-plus (删除原来安装的 element-plus)
vue add element-plus
main.js文件中:
删除 原来的引入代码
import ElementPlus from 'element-plus'
import 'element-plus/dist/index.css'
使用自动添加的引入代码即可
解决使用element-plus 下拉菜单时,向下箭头图标不显示 的问题
解决方法:
需要在该显示页面引入ArrowDown:
import { ArrowDown } from ‘@element-plus/icons-vue’
并在该页面中注册component:
export default {
  name: "Header",
  components:{
    ArrowDown
  }
};
最后提示需要安装 icons-vue:
npm install –save @element-plus/icons-vue
同理,遇到element-plus中的图标不显示时,同样这样解决!
安装axios实现前后端请求交互
vue目录下安装axios:
npm i axios -S
src下新建utils目录,新建request.js文件,将以下代码添加进去
request.js
import axios from 'axios'

const request = axios.create({
    baseURL: '/api',
    timeout: 5000
})

// request 拦截器
// 可以自请求发送前对请求做一些处理
// 比如统一加token,对请求参数统一加密
request.interceptors.request.use(config => {
    config.headers['Content-Type'] = 'application/json;charset=utf-8';

    // config.headers['token'] = user.token;  // 设置请求头
    return config
}, error => {
    return Promise.reject(error)
});

// response 拦截器
// 可以在接口响应后统一处理结果
request.interceptors.response.use(
    response => {
        let res = response.data;
        // 如果是返回的文件
        if (response.config.responseType === 'blob') {
            return res
        }
        // 兼容服务端返回的字符串数据
        if (typeof res === 'string') {
            res = res ? JSON.parse(res) : res
        }
        return res;
    },
    error => {
        console.log('err' + error) // for debug
        return Promise.reject(error)
    }
)

export default request
main.js引入(这里不能写错,否则前端页面空白)
Vue.prototype.request=request
然后会自动导包
import request from "@/utils/request";
深拷贝(解决编辑未确认就改变)
解决 :Vue 编辑按钮打开弹窗,输入信息后没点确定按钮就已经把数据更改了(此时表格的当前行数据改变了,但没有提交到数据库中)
我们需要的是:点击确定按钮 , 表格才修改
修改编辑函数 handleEdit ()中 表单数据 form的获取
this.form = JSON.parse(JSON.stringify(row))
删除按钮加弹窗
<el-table-column label="操作" width="200" align="center">
              <template slot-scope="scope"> <!-- scope:操作当前行的数据 -->
              <el-button type="success" @click="handleEdit(scope.row)">编辑 <i class="el-icon-edit"></i></el-button>
              <el-popconfirm
                  style="margin-left: 5px"
                  confirm-button-text='确定'
                  cancel-button-text='我在想想'
                  icon="el-icon-info"
                  icon-color="red"
                  title="确定删除吗?"
                  @confirm="del(scope.row.id)"
              >
              <el-button type="danger" slot="reference">删除 <i class="el-icon-remove-outline"></i></el-button>
              </el-popconfirm>
              </template>
            </el-table-column>
具体删除的点击事件绑定的是 弹出来的确定按钮
删除事件名:@confirm=“del(scope.row.id)” ,不能写 delete ,会报错 ,应该是element ui的方法重名
批量删除
后台用PostMapping
前端用Post请求,因为参数是数组,delete请求不支持
let ids = this.multipleSelection.map(v => v.id) //前端map函数将对象数组 转成 id数组
Vue div
Vue 的根只能是一个div,不能存在多个div 在同一级,所以要把同级并行的多个div再放入一个根div中
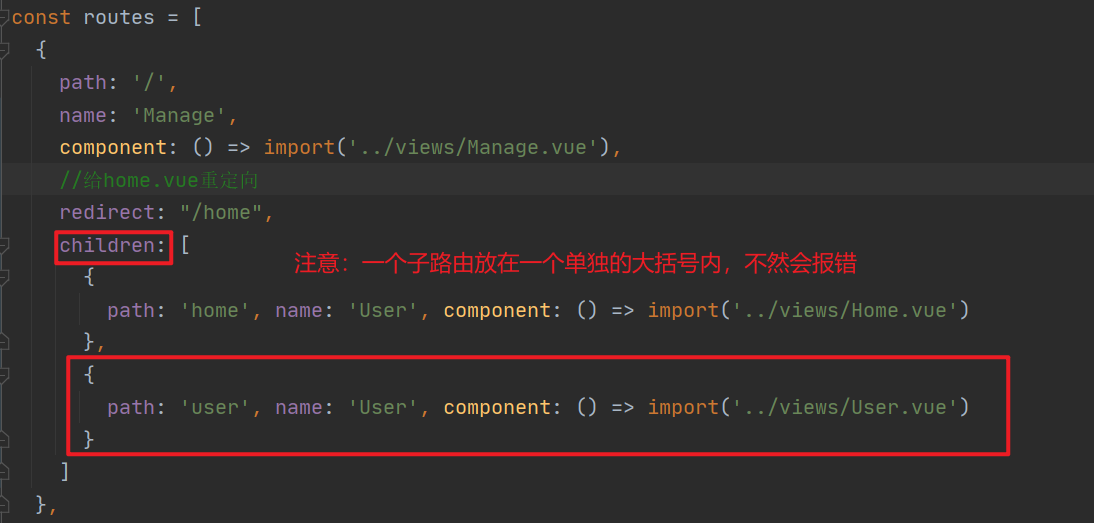
配置子路由

前端配置路由
router\index.js文件中一定要引入 store,否则前端页面白屏
import Vue from 'vue'
import VueRouter from 'vue-router'
import store from "@/store" //注意别忘了
request请求
前端请求 this.request , 默认是get接口,其他接口请求需要加上 .post , .delete 等
需要传递参数,如登陆注册,一般用post请求
前端存储用户信息
//用户登录请求后,前端存储用户信息到浏览器
localStorage.setItem("user",JSON.stringify(res.data))
用户头像和昵称
<div style="display: inline-block">
        <img src="../assets/am4qu-utkn4.png" alt="" style="width: 30px; border-radius: 50%; position: relative; top: 10px; right: 5px">
        <span>管理员</span><i class="el-icon-arrow-down" style="margin-left: 5px"></i>
      </div>
后端
yml配置文件
server:
  port: 9090

spring:
  mvc:
    pathmatch:
      matching-strategy: ant_path_matcher  #解决SpringBoot2.6.4集成Swagger3.0.0报错(不用Swagger可忽略)
  datasource:
    driver-class-name: com.mysql.cj.jdbc.Driver
    url: jdbc:mysql://localhost:3306/backsystem?useUnicode=true&characterEncoding=utf-8
    username: root
    password: hyy20010416

mybatis:
  mapper-locations: classpath:mapper/*.xml  #扫描所有mybatis的xml文件
#mybatis日志,可以在控制台打印具体执行的sql语句
#  configuration:
#    log-impl: org.apache.ibatis.logging.stdout.StdOutImpl

#使用了mybatis-plus的日志配置
mybatis-plus:
  configuration:
    log-impl: org.apache.ibatis.logging.stdout.StdOutImpl
mybatis的xml文件通用格式
<?xml version="1.0" encoding="UTF-8"?>
<!DOCTYPE mapper PUBLIC "-//mybatis.org//DTD Mapper 3.0//EN"
        "http://mybatis.org/dtd/mybatis-3-mapper.dtd">
<mapper namespace="Mapper接口的全限定名称">
    这里写sql
</mapper>
mybatis的sql语句 要么在Mapper接口中用mybatis的注解写,要么在Mapper.xml
文件中通过标签的形式来写
mybatis动态sql复习
<if>
对于该标签的执行,当 test 的值为 true 时,会将其包含的 SQL 片断拼接到其所在的 SQL 语句中。
语法:<if test="条件"> sql 语句的部分 </if>


<where>
<if/>标签的中存在一个比较麻烦的地方:需要在 where 后手工添加 1=1 的子句。因为,若 where 后
的所有<if/>条件均为 false,而 where 后若又没有 1=1 子句,则 SQL 中就会只剩下一个空的 where,SQL
出错。所以,在 where 后,需要添加永为真子句 1=1,以防止这种情况的发生。但当数据量很大时,会
严重影响查询效率
使用<where/>标签,在有查询条件时,可以自动添加上 where 子句;没有查询条件时,不会添加
where 子句。需要注意的是,第一个<if/>标签中的 SQL 片断,可以不包含 and。不过,写上 and 也不错,
系统会将多出的 and 去掉。但其它<if/>中 SQL 片断的 and,必须要求写上。否则 SQL 语句将拼接出错

    (<where>标签解决直接用where需要添加1=1影响效率的问题)

语法:<where> 其他动态 sql </where>


<foreach>
<foreach/>标签用于实现对于数组与集合的遍历。对其使用,需要注意:collection 表示要遍历的集合类型, list ,array 等。open、close、separator 为对遍历内容的 SQL 拼接。

语法:
<foreach collection="集合类型" open="开始的字符" close="结束的字符"
item="集合中的成员" separator="集合成员之间的分隔符">
#{item 的值}
</foreach>
Spring Boot配置跨域类
前端遇到跨域访问后台的问题,只需在Spring Boot项目中添加如下配置文件即可
(只是其中一种方法,还可以使用过滤器和@CrossOrigin注解)
import org.springframework.context.annotation.Configuration;
import org.springframework.web.servlet.config.annotation.CorsRegistry;
import org.springframework.web.servlet.config.annotation.WebMvcConfigurer;

@Configuration
public class CorsConfig implements WebMvcConfigurer {

    @Override
    public void addCorsMappings(CorsRegistry registry) {
        registry.addMapping("/**")
                .allowedOrigins("*")
                .allowedOriginPatterns("*")
                .allowedHeaders("*")
                .allowedMethods("GET","POST","DELETE","PUT","OPTIONS")
                .maxAge(3600);
    }
}
忽略某个字段,不展示给前端(@JsonIgnore)
前端的请求数据中,若想要忽略某个字段,不展示给前端,比如前端查询用户的全部数据字段,但由于密码较为隐私,不宜展示,可以在Entity的javabean 中的密码属性上面使用 @JsonIgnore注解
mysql模糊查询
concat字符串拼接
where username like concat ('%', #{username}, '%')
mybatis-plus依赖
<dependency>
    <groupId>com.baomidou</groupId>
    <artifactId>mybatis-plus-boot-starter</artifactId>
    <version>3.5.1</version>
</dependency>
MybatisPlusConfig.java
使用mybatis-plus分页插件的配置类
import com.baomidou.mybatisplus.annotation.DbType;
import com.baomidou.mybatisplus.extension.plugins.MybatisPlusInterceptor;
import com.baomidou.mybatisplus.extension.plugins.inner.PaginationInnerInterceptor;
import org.mybatis.spring.annotation.MapperScan;
import org.springframework.context.annotation.Bean;
import org.springframework.context.annotation.Configuration;

/**
 *@Description  使用mybatis-plus分页插件的配置
 *@Author SheepHe
 *@Date 2022/3/10 18:57
**/

@Configuration
@MapperScan("com.sheephe.springboot.mapper") ////扫描所有的mapper接口(不要放在启动类上,统一放在配置类上)
public class MybatisPlusConfig {
    /**
     * 最新版
     */
    @Bean
    public MybatisPlusInterceptor mybatisPlusInterceptor() {
        MybatisPlusInterceptor interceptor = new MybatisPlusInterceptor();
        interceptor.addInnerInterceptor(new PaginationInnerInterceptor(DbType.MYSQL));
        return interceptor;
    }

}
Mapper接口继承BaseMapper<>
public interface UserMapper extends BaseMapper<User> {

}
使用mybatis-plus通用的service
Service接口 继承 IService<T>接口,然后 Service接口的实现类 继承 ServiceImpl<操作实体的Mapper接口,具体实现类>,最后在ServiceImpl实现类添加@Service注解将该实现类作为Spring容器下的Bean
@TableName(value = “sys_user”)
指定数据库表的名称
@TableField(value = “avatar_url”)
private String avatar;
指定数据库字段的名称
(如果数据库字段是下划线命名,如avatar_url, java属性名是驼峰命名,字符串是一致的,则框架会自动将下划线转驼峰,不用加该注解)
Spring Boot集成Swagger-UI
访问地址:http://localhost:9090/swagger-ui/index.html
使用Swagger 3.0.0
pom.xml
 <dependency>
     <groupId>io.springfox</groupId>
     <artifactId>springfox-boot-starter</artifactId>
     <version>3.0.0</version>
 </dependency>
SwaggerConfig.java
import org.springframework.context.annotation.Bean;
import org.springframework.context.annotation.Configuration;
import springfox.documentation.builders.ApiInfoBuilder;
import springfox.documentation.builders.PathSelectors;
import springfox.documentation.builders.RequestHandlerSelectors;
import springfox.documentation.oas.annotations.EnableOpenApi;
import springfox.documentation.service.ApiInfo;
import springfox.documentation.service.Contact;
import springfox.documentation.spi.DocumentationType;
import springfox.documentation.spring.web.plugins.Docket;

@Configuration
@EnableOpenApi
public class SwaggerConfig {


    /**
     * 创建API应用
     * apiInfo() 增加API相关信息
     * 通过select()函数返回一个ApiSelectorBuilder实例,用来控制哪些接口暴露给Swagger来展现,
     * 本例采用指定扫描的包路径来定义指定要建立API的目录。
     *
     * @return
     */
    @Bean
    public Docket restApi() {
        return new Docket(DocumentationType.SWAGGER_2)
                .groupName("标准接口")
                .apiInfo(apiInfo("Spring Boot中使用Swagger2构建RESTful APIs", "1.0"))
                .useDefaultResponseMessages(true)
                .forCodeGeneration(false)
                .select()
           		.apis(RequestHandlerSelectors.basePackage("com.sheephe.springboot.controller"))
                .paths(PathSelectors.any())
                .build();
    }

    /**
     * 创建该API的基本信息(这些基本信息会展现在文档页面中)
     * 访问地址:http://ip:port/swagger-ui.html
     *
     * @return
     */
    private ApiInfo apiInfo(String title, String version) {
        return new ApiInfoBuilder()
                .title(title)
                .description("更多请关注: https://blog.csdn.net/xqnode")
                .termsOfServiceUrl("https://blog.csdn.net/xqnode")
                .contact(new Contact("xqnode", "https://blog.csdn.net/xqnode", "xiaqingweb@163.com"))
                .version(version)
                .build();
    }


}
Spring Boot 2.6.4 集成 Swagger 3.0.0 报错
这两个版本的集成,会导致项目直接启动不起来。
Spring Boot2.6更改了请求路径与与SpringMVC路径匹配规则,已经不是原来的AntPathMatcher了,改为了PathPatternParser。可能swagger3.0的一些地址还没作出相应的更新所以出错了。
只需在yml配置文件中添加如下配置
spring:
  mvc:
    pathmatch:
      matching-strategy: ant_path_matcher
mybatis-plus 代码生成器
<dependency>
    <groupId>com.baomidou</groupId>
    <artifactId>mybatis-plus-generator</artifactId>
    <version>3.5.2</version>
</dependency>
